
Microsoft Teams is a powerful tool that helps individuals and organizations collaborate effectively. However, like any software, it can face performance issues over time. One of the most common solutions to improve a team’s performance is clear teams cache. This simple guide will help you understand what cache is, why you should clear it, and how to do it on different devices. Let’s dive into it!
What is Cache in Microsoft Teams?
The clear teams cache is temporary data stored by an application to make processes run faster. When you use Microsoft Teams, it stores files, images, and settings locally on your computer to avoid reloading them every time you open the app. This helps Teams run more quickly when you’re using it. However, over time, these cache files can accumulate and cause issues, such as slow performance or outdated content. Clearing the cache can help resolve these problems and keep Teams running smoothly.
Why Should You Clear the Cache?
Clearing the cache can help resolve several common problems you may encounter while using Microsoft Teams. As cache files accumulate, they can lead to:
- Slow performance: Overloaded cache files can cause Teams to respond slower than usual.
- Outdated information: The cache might store old messages or files, preventing you from seeing the latest updates.
- Corrupted files: Occasionally, the cache files can become corrupted and cause errors or crashes in the app.
- General glitches: Clearing the cache can fix a variety of minor bugs or issues, like trouble with notifications or syncing.
Clearing the cache does not delete important data like chats, meetings, or files. It only removes temporary files, making Teams work faster and more reliably.
Easy Steps to Clear Teams Cache on Windows
Clearing the cache on Windows is a simple process. Just follow these steps to get started:
Close Microsoft Teams Completely
Before clearing the cache, make sure Microsoft Teams is closed completely. You can do this by right-clicking the Teams icon in the taskbar or system tray and selecting Quit. Alternatively, you can press Ctrl + Shift + Esc to open Task Manager and close Teams from there if it’s still running.
Find the Cache Folder
Once Teams is closed, the next step is to locate the cache folder on your computer. Here’s how you can do it:
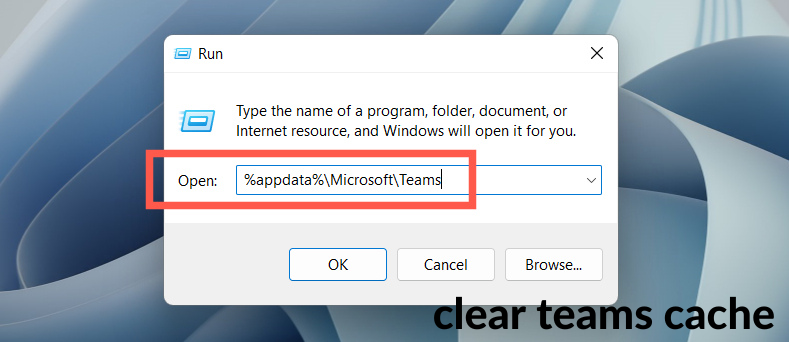
- Press Windows + R to open the Run dialog box.
- Type %appdata%\Microsoft\Teams and press Enter. This will take you directly to the folder where Teams stores its cache files.
- You’ll see a list of folders and files that Teams uses for cache, logs, and other settings.
Delete the Cache Files
Now that you’re in the cache folder, it’s time to delete the cache files. Follow these steps:
- Select all files in the folder by pressing Ctrl + A.
- Right-click and choose Delete or simply press the Delete key on your keyboard.
- After the files are deleted, restart Microsoft Teams. It will automatically regenerate the necessary cache files, but this time, they’ll be fresh and free of any old or corrupted data.
Here is a simple bio table format you can use:
| Name | [Your Name] |
|---|---|
| Occupation | [Your Occupation/Profession] |
| Location | [Your Location] |
| Skills | [Key Skills or Expertise] |
| Education | [Your Educational Background] |
| Experience | [Years of Experience] |
| Contact | [Your Contact Information] |
You can replace the placeholders with your personal or professional information. Let me know if you’d like a more specific format!
How to Clear Teams Cache on Mac
The process to clear the cache on a Mac is similar, but the location of the cache files is different. Here’s how to do it:
- Quit Microsoft Teams: First, close Teams completely by selecting Quit Microsoft Teams from the Teams menu in the top-left corner of your screen.
- Access the Cache Folder: Open the Finder and go to the following directory:
- javascript
- Copy code
- ~/Library/Application Support/Microsoft/Teams
- You can access the Library folder by holding down the Option key while clicking on Go in the Finder’s menu and then selecting Library.
- Delete the Cache Files: Once you’re in the Teams folder, look for files that contain cache data (such as Cache, blob_storage, databases, etc.) and delete them.
- Restart Microsoft Teams: After deleting the files, open Teams again. It will rebuild the cache from scratch, improving the app’s performance.
Can Clearing the Cache Fix Teams Issues?
Yes, clearing the cache can resolve many issues in Microsoft Teams. If you’re experiencing problems like:
- Slow app performance
- Stale content (outdated messages, images, or files)
- Notification errors or missed messages
- Crashes or freezing issues
Clearing the cache removes corrupted or outdated files that might be causing these problems, and allows Teams to function properly. It’s a quick and effective solution to fix minor bugs and glitches.
How Often Should You Clear Teams Cache?
It’s not necessary to clear the cache every day. However, you should consider clearing the cache if:
- Teams are running slowly: If you notice a performance drop over time, clearing the cache can speed things up.
- You’re experiencing issues: If you encounter errors, crashes, or glitches, clearing the cache is often the first step in troubleshooting.
- There are updates or changes to Teams: After major updates, it might help to clear the cache to avoid conflicts between old and new files.
Signs That You Need to Clear Cache
Look for these signs that it’s time to clear Teams’ cache:
- Teams are lagging or freezing: This often indicates that old cache files are slowing the app down.
- You’re not seeing new messages: Cache files can store outdated messages, leading to syncing issues.
- The app behaves erratically: If Teams crashes or doesn’t open properly, clearing the cache can help fix these problems.
How Clearing Cache Affects Your Data
Clearing the cache won’t delete your messages, meetings, or files in Teams. It only removes temporary files used to speed up the app. However, be aware that:
- Login may be required again: Teams may prompt you to log in again after clearing the cache.
- Settings may be reset: Some settings, like theme preferences or app-specific configurations, might be reset to default.
However, your important data remains untouched.
Steps to Access Cache Settings
In some cases, Microsoft Teams may offer an option to access cache settings directly from within the app. This can be found in the Teams settings under the General section. However, most users will find it quicker and more effective to follow the manual steps outlined above.
Troubleshooting After Clearing the Cache
After clearing the cache, if you continue to experience issues with Microsoft Teams, try the following troubleshooting steps:
- Check for updates: Ensure Teams is up to date by checking for software updates in the app settings.
- Restart your computer: Sometimes, a simple restart can help resolve lingering issues after clearing the cache.
- Reinstall Teams: If the problems persist, you may need to uninstall and reinstall Microsoft Teams to ensure that no other issues are causing the performance problems.
The Bottom Line
Clearing the cache in Microsoft Teams is a simple yet effective way to solve many performance-related issues. By removing temporary files, you can help Teams run faster, fix syncing problems, and prevent glitches. Whether you’re using Teams on Windows or Mac, following the steps to clear the cache can make a big difference in your experience.
Remember, it’s not necessary to clear the cache regularly, but it’s a great first step when troubleshooting team issues. By maintaining a clean cache, you can keep Microsoft Teams running smoothly, so you can focus on collaborating and staying productive.